7 Best Seasonal Crafts for Elementary School Kids
Spark year-round creativity with seven easy, classroom-tested projects. You’ll make Spring Blossom Tissue Paper Trees, an Earth Day Recycled Collage, and Summer Ocean Paper Plate Portholes. Try Sunprint Nature Cyanotypes on sunny days. In fall, do Leaf Rubbings with simple crayon resist, then build Thanksgiving Gratitude Paper Chains. For winter, cut Snowflake Symmetry designs. Each uses simple supplies, clear steps, and labels for display. Get tips for setup, variations, and storytelling prompts next.
Key Takeaways
- Spring tissue-blossom trees: paint cardstock trunks, pinch pastel tissue squares into blossoms, glue, label, and display.
- Earth Day recycled Earth collage: cardboard circle base, torn magazine scraps for land and sea, add caps/foil, title “Our Earth.”
- Summer porthole craft: cut paper plate center, paint frame, ocean scene on blue paper under clear plastic, add bolt dots, hang with yarn.
- Fall leaf rubbings: collect leaves, do crayon rubbings and white-crayon resists, make bookmarks or garlands, label leaf types.
- Winter paper snowflakes: fold square paper, cut symmetrical shapes, predict outcomes, unfold to compare, label and window-display.
Spring Blossom Tissue Paper Trees
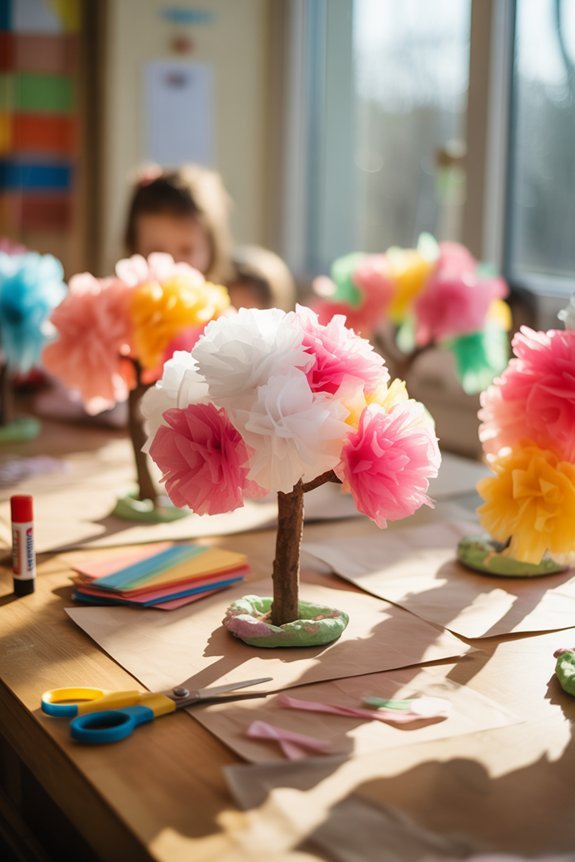
Start with a simple plan: you’ll make a sturdy tree trunk and add soft tissue blossoms on top.
Draw a trunk and branches on cardstock, then color or paint them brown. Let it dry.
Sketch a sturdy trunk and branches on cardstock, paint them brown, and let dry.
While you wait, cut pastel tissue paper into small squares. Next, pinch each square in the center to form a tiny blossom.
Add glue dots along the branches. Press each blossom onto a dot, filling the limbs with color. Mix pinks, whites, and light yellows for a spring look.
For extra texture, layer two squares per flower. Step back and check gaps; add a few more blooms where needed.
Label your tree art with your name and date. Display it on a wall to brighten your classroom.
Earth Day Recycled Collage Art
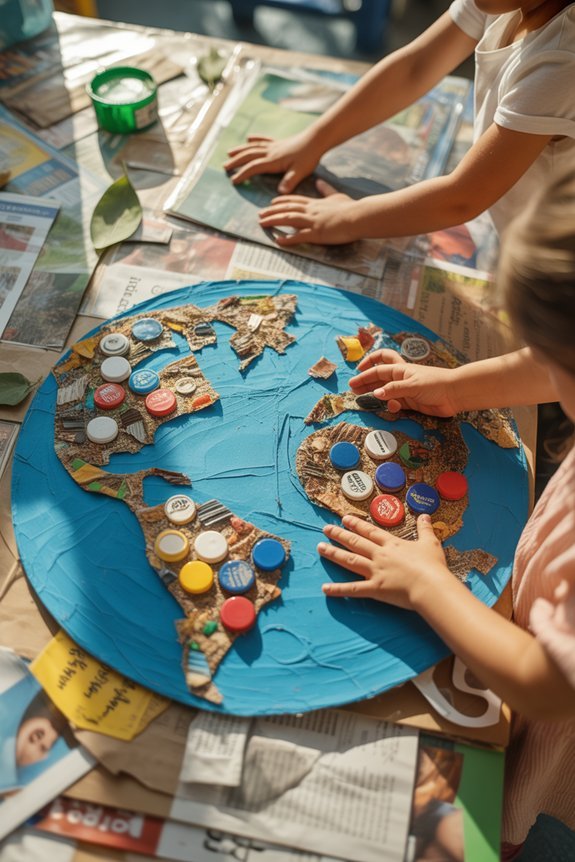
Although it’s simple, this Earth Day project makes a big impact: you’ll turn clean recyclables into a colorful collage that celebrates the planet.
Gather recycled materials like magazine pages, cardboard, bottle caps, foil, and fabric scraps. Cut a circle base from cardboard for Earth. Sketch simple continents with pencil.
Use basic collage techniques: tear paper for soft edges, cut shapes for sharp borders, and layer pieces for texture. Glue blue scraps for oceans, then add green and brown for land. Press flat with your palm as you go.
Add bottle caps as flowers or animals, and foil for shimmering rivers.
Finish with a title strip: “Our Earth.” Let it dry, then display it. You’ve reused, designed thoughtfully, and created meaningful art.
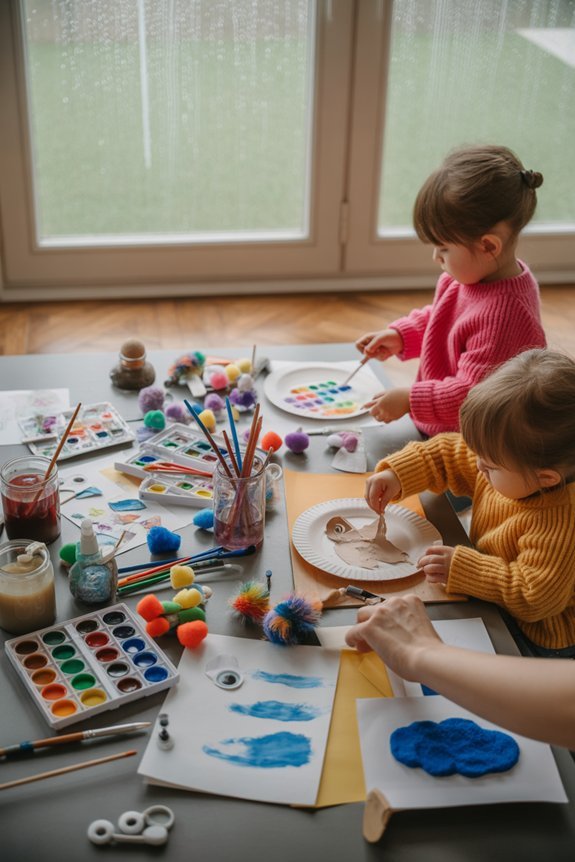
Summer Ocean Paper Plate Portholes

Three quick steps turn a plain paper plate into a ship’s porthole peeking into the ocean.
Grab a sturdy plate, blue paint or crayons, scissors, glue, and clear plastic from packaging. You’ll make simple, eye-catching paper plate art that fits right into your ocean themed crafts.
Step 1: Cut out the center of the plate to form the porthole frame. Paint it gray or gold and let it dry.
Step 2: On a circle of blue paper, draw waves, fish, and a turtle. Add sequins for bubbles. Glue the clear plastic over this scene.
Step 3: Glue the decorated frame on top. Add “bolts” with marker dots. Punch a hole and tie yarn to hang.
Encourage kids to tell a sea story while they display it.
Sunprint Nature Cyanotypes
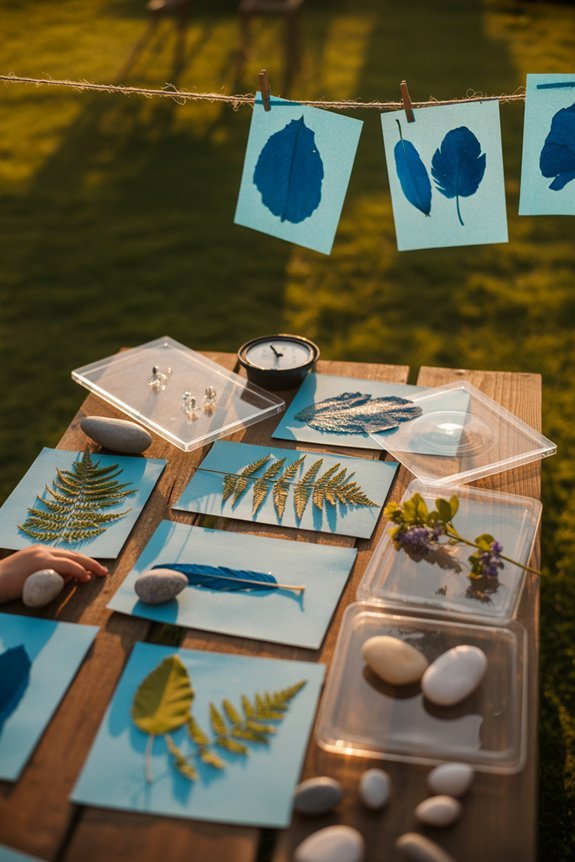
When the sun’s out, you can make magical blue-and-white prints using leaves, flowers, and found nature.
Grab sunprint paper or a cyanotype kit, a tray of water, and a flat board. Go on quick nature exploration to collect small, flat items. Work in the shade.
Gather sunprint paper, water tray, and board. Forage flat finds, then arrange in shade.
Place paper on the board, blue side up. Arrange leaves and petals. Add a clear cover, like plastic or glass, to keep everything flat.
Carry it into sunlight. Expose for 2–5 minutes; the paper lightens. Bring it back to the shade. Rinse in water until the white turns bright and the blue deepens. Let it dry.
Try simple sunprint techniques: layer shapes, use lace or stencils, or frame silhouettes. You’ll make striking, scientific art in minutes.
Fall Leaf Rubbings and Resist Art
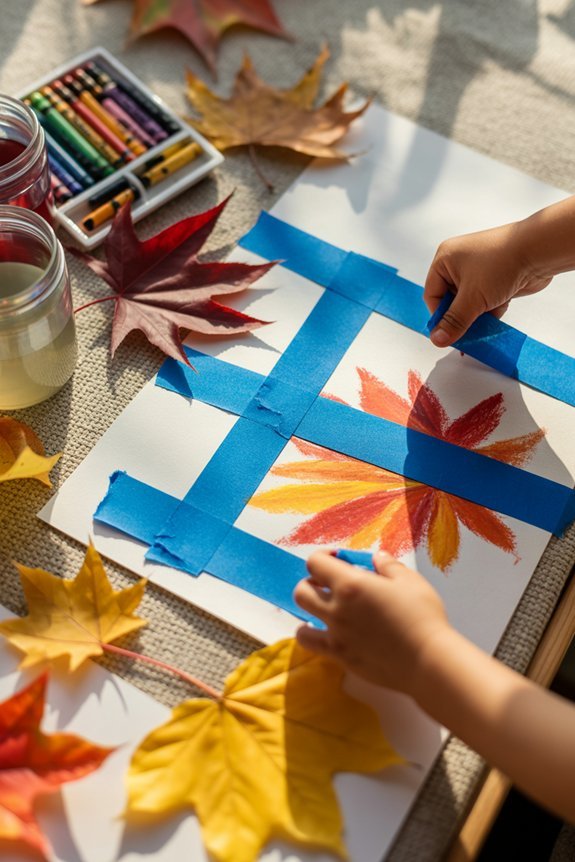
Start by collecting colorful leaves in different shapes and sizes from your yard or a nearby park.
Place a leaf under thin paper, hold it steady, and rub a crayon on its side gently over the surface to reveal the veins.
Try several colors and leaves to make a bright fall collage.
Collecting Colorful Leaves
Two easy projects make fall leaves extra fun to collect: rubbings and resist art. Start with a simple nature scavenger hunt. Give kids a small bag and a checklist: red, orange, yellow, brown, speckled, tiny, and big. Remind them to choose dry leaves from the ground. Keep stems intact so they’re easy to carry.
Do quick leaf color exploration before crafting. Line leaves from light to dark. Talk about edges—smooth, jagged, or lobed—and notice veins. If a leaf bends, press it flat in a book for a day.
Clean the table, then sort leaves by size for each project. Set aside the flattest ones for rubbing and the bold shapes for resist designs.
Store extras between paper towels so they don’t curl.
Crayon Rubbing Technique
A crayon rubbing turns leaf textures into instant art. Place a dry leaf vein-side up, cover it with thin paper, and hold it steady. Peel the wrapper off a crayon, lay the crayon sideways, and rub gently. Watch the veins appear. Try different colors and pressures to explore crayon techniques.
Next, make a simple resist. Draw bold shapes or words with a white crayon on clean paper. Tape a few leaves underneath, then rub over the surface with fall colors. The hidden design pops through the leaf patterns.
For creative applications, cut out your rubbings for bookmarks, greeting cards, or a classroom garland. Layer rubbings for depth, or group warm and cool palettes. Label leaf types to sneak in science.
Display your mini gallery proudly.
Thanksgiving Gratitude Paper Chains
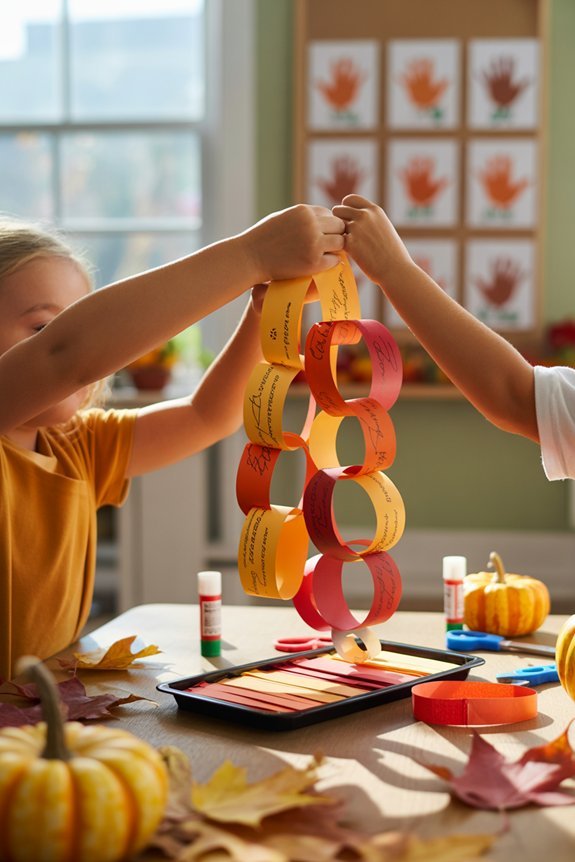
Gather a handful of colorful paper strips and turn them into a simple gratitude chain that celebrates Thanksgiving. You’ll guide kids through quick gratitude activities that spark thankful reflections and build a cheerful display. Prep strips, markers, and a stapler or glue. Model one link, then let kids add their own.
- Step 1: Ask, “What are you thankful for today?”
- Step 2: Write one idea per strip.
- Step 3: Form a loop; staple or glue.
- Step 4: Thread the next strip through; repeat.
- Step 5: Hang the chain across a doorway.
| Prompt Idea | Example Response |
|---|---|
| Person | My bus driver |
| Place | The school library |
| Object | My warm coat |
| Experience | Reading time |
| Goal | Learning kindness |
Extend by color-coding themes, pairing with read-alouds, and inviting family contributions.
Winter Snowflake Symmetry Cutouts
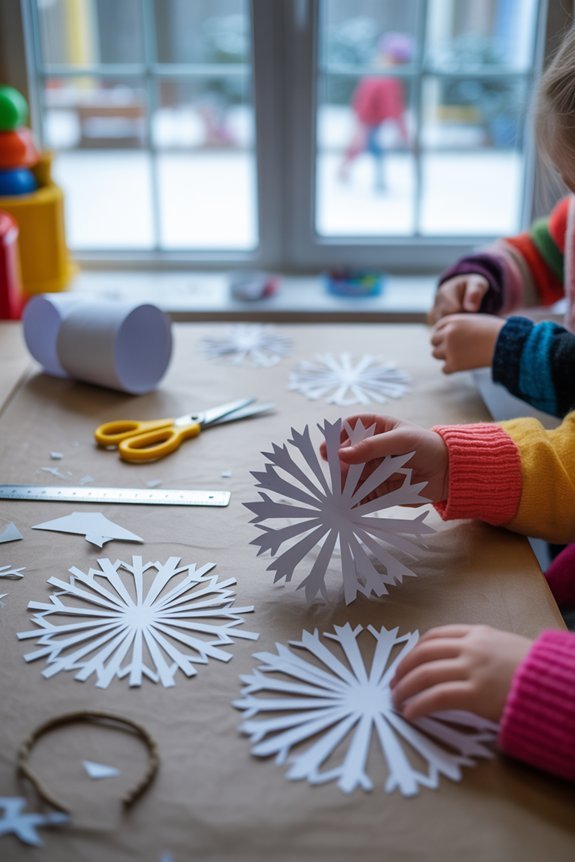
After building a bright gratitude chain, shift to crisp, wintry art with paper snowflakes that show symmetry. Gather white paper, scissors, a pencil, and optional glitter.
Fold a square into a triangle, then fold the triangle twice more to make a narrow wedge. Keep folds tight.
Mark a curved edge and tiny shapes along the sides. Cut carefully; don’t cut all the way across. Open slowly to reveal snowflake patterns.
Try different wedges, angles, and cutouts for rich symmetry exploration. Guide kids to predict results before cutting, then compare outcomes. Ask, “What stayed the same on each side?”
Label each design and display them on windows. Add math talk: count points, reflect halves, and rotate designs. Encourage creativity, neat cuts, and safe scissor use.
In case you were wondering
How Can I Adapt Crafts for Children With Sensory Sensitivities?
Adapt crafts by offering sensory friendly materials, short steps, and choices. Start with soft textures, dim lights, and quiet space. Model calmly, then let kids pace themselves. Use timers, breaks, and calm down techniques. Celebrate small successes.
What Safety Precautions Are Needed for Glue, Scissors, and Dyes?
Safe, sensible steps: You check labels, choose non-toxic glue, and cap it. You use blunt scissors with tool supervision. You wear gloves, test dyes on scraps, protect surfaces, and rinse skin. You teach safety guidelines calmly.
How Do I Manage Cleanup Efficiently in a Classroom Setting?
Set clear cleanup stations. Assign rotating student roles: collectors, wipers, sorters, inspectors. Give a quick checklist. Start a five-minute timer. Model each step. Use labeled bins, damp cloths, and brooms. Praise teamwork. Finish with a final sweep.
What Standards or Learning Objectives Do These Crafts Support?
They support art, ELA, math, science, and SEL goals. You ensure craft alignment to educational standards by: choosing clear objectives, mapping skills, planning steps, assessing outcomes, documenting evidence, reflecting improvements. You’ll link creativity with measurable learning every time.
How Can I Modify Activities for Limited Time or Materials?
Tackle tight schedules like you’re racing a thousand clocks. Prioritize goals, trim steps, batch tasks—time management first. Use material substitution: swap paper for scraps, glue for tape, paint for crayons. Prepare templates, demo quickly, assign roles, clean-as-you-go.
Conclusion
You’ve explored crafts for every season: you cut, you glue, you paint. You notice textures, you reuse materials, you try new steps. In spring, you build blossoms; in summer, you capture sun; in fall, you rub leaves; in winter, you fold snowflakes. Start with simple supplies, follow each step, celebrate small wins. Make one today, make another tomorrow, make memories all year. Create together, clean up together, share together. Keep making, keep learning, keep smiling.