10 Easy DIY Halloween Costumes With Kids
You can create amazing DIY Halloween costumes with your kids using items you probably already have at home. Try a classic ghost with a decorated sheet, a cardboard box robot, a no-sew superhero cape, or a bubble bath costume with balloons. Paper plate animal masks, toilet paper mummies, and old-clothes scarecrows are quick wins too. These projects spark creativity and make memories—and you’ll find step-by-step details for each one below.
Key Takeaways
- Transform a white sheet into a classic ghost costume by cutting eye holes and adding accessories like chains or sparkly ribbons.
- Build a robot costume using cardboard boxes painted silver and decorated with buttons, bottle caps, or old CDs.
- Create a no-sew superhero cape and mask from felt fabric, cutting simple shapes and attaching elastic for easy wear.
- Construct a playful bubble bath costume using a cardboard box painted blue and decorated with white balloons as bubbles.
- Make quick animal face masks from paper plates that kids can paint and customize with their favorite creature designs.
Classic Ghost With a Twist
When you want a costume that’s simple but still feels special, the classic ghost sheet gets a fun upgrade. Start with a white sheet and cut out eye holes together. Then make it magical with these easy additions:
- Add ghostly accessories like chains, a tiny top hat, or sparkly ribbons
- Try colorful spooky facepaint around the eyes—think glitter, stars, or swirls
- Use fabric markers to draw fun patterns on the sheet
Your child can help decide what kind of ghost they want to be. A friendly ghost? A silly one? A glam ghost with sequins?
Let your little one choose their ghost personality—friendly, silly, or totally glamorous!
This costume takes minutes but feels creative. You’re building memories while keeping things stress-free. That’s a win for everyone.
Cardboard Box Robot
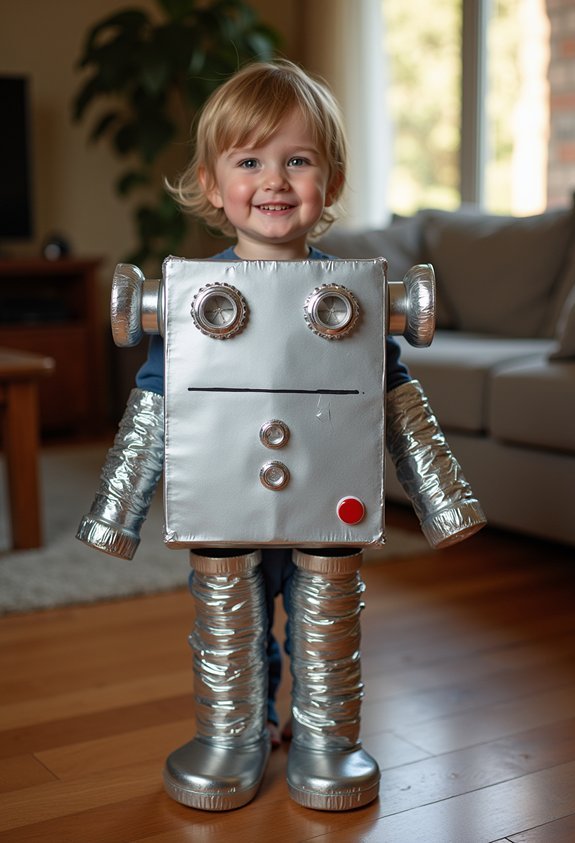
A cardboard box and a little imagination are all you need to transform your child into an awesome robot. This costume lets kids express their creativity while keeping things simple and budget-friendly.
What You’ll Need:
- Large cardboard box for the body
- Small box for the head
- Silver or metallic paint
- Buttons, bottle caps, or old CDs for robot accessories
Getting Started:
Cut arm and head holes in the large box. Let your child take the lead on cardboard painting—silver works great, but any color goes! Add robot accessories like drawn-on dials, glued buttons, or pipe cleaner antennas.
The best part? Every robot looks different. Your little one’s unique touches make it special.
No-Sew Superhero Cape and Mask

Every superhero needs a cape, and you don’t need a sewing machine to make one. Grab these no sew materials: felt fabric, fabric scissors, and elastic ribbon.
Capes don’t require sewing skills—just felt, scissors, and ribbon to unleash your little one’s inner hero.
For the cape:
- Cut felt into a rectangle (about 27 x 36 inches for kids)
- Cut a small semicircle at the top center for the neck
- Add ribbon ties at each corner
For the mask:
- Cut an eye mask shape from matching felt
- Punch small holes on each side
- Thread elastic through to fit your child’s head
Let superhero creativity take over! Your child can add lightning bolts, stars, or their own symbol using extra felt pieces and fabric glue. They’ll feel unstoppable.
Bubble Bath Costume

Ready to swap the superhero look for something splashy and silly? The bubble bath costume brings big laughs with minimal effort.
What You’ll Need:
- Large cardboard box or laundry basket
- White balloons (lots of them)
- Blue fabric or paint
- Rubber ducky
- Loofah or bath brush
How to Create It:
- Cut the bottom out of your box so your child can step inside
- Paint or cover it in light blue to look like water
- Blow up white balloons as bubble bath props
- Attach balloons around the top edge with tape or glue
- Add bubble bath accessories like a rubber ducky headband or loofah wand
Your child will look adorably fresh and ready for trick-or-treating fun.
Paper Plate Animal Faces
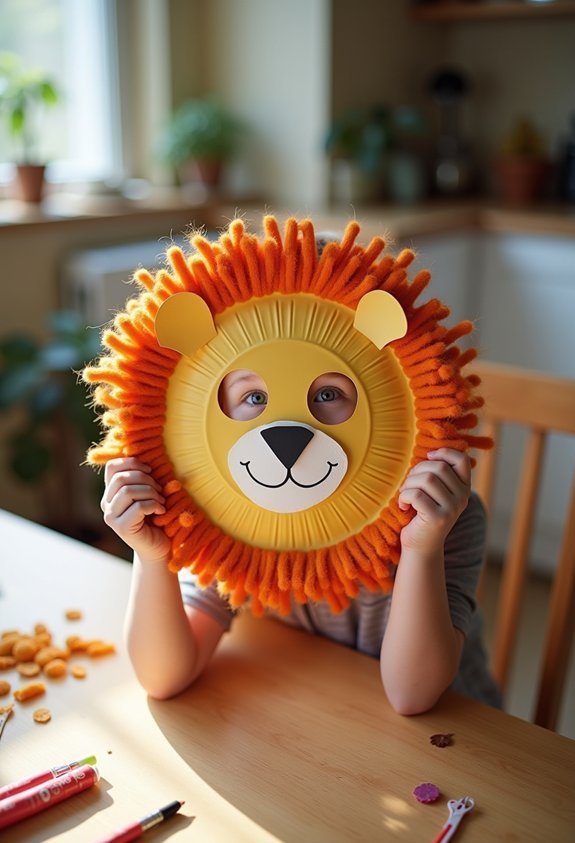
When you’re short on time but still want a fun costume, paper plate animal faces come to the rescue. Kids love this project because it’s quick and totally their own.
What you’ll need:
- Paper plates
- Paint and brushes
- Elastic string
- Scissors
Start with animal face templates for guidance. Print a lion, cat, or owl outline to inspire your child’s design. Then let creative painting techniques take over. Try sponge dabbing for fuzzy textures or finger dots for spots.
Cut eye holes carefully. Punch side holes and thread elastic through.
Your child picks the animal. You help with tricky cuts. Together you create something special in under thirty minutes. That’s a win.
Crayon Box Group Costume
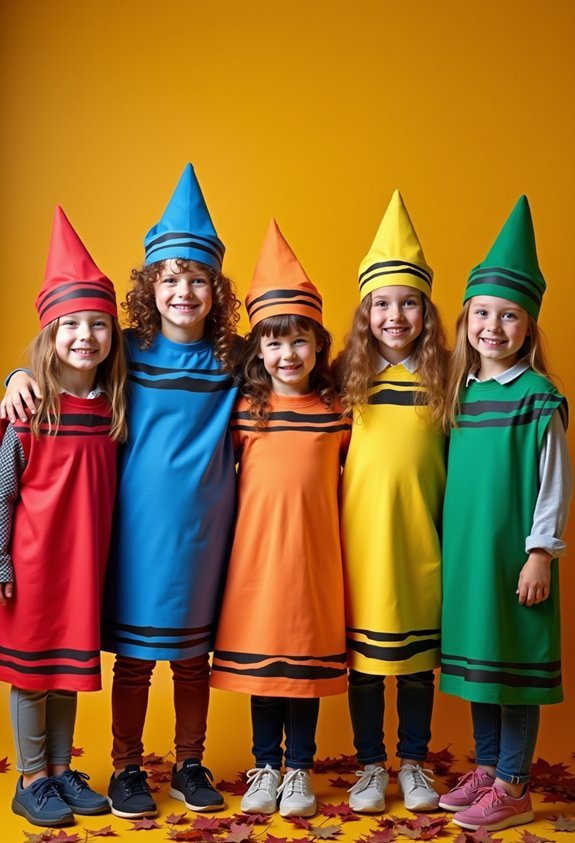
Group costumes bring everyone together, and a crayon box is one of the easiest ways to make that happen.
What You’ll Need:
- Solid-colored t-shirts or dresses
- Black felt or fabric paint
- Cardboard for crayon tips
Simple Steps:
- Pick your crayon colors. Let each person choose their favorite.
- Cut a triangle from cardboard and paint it to match the shirt color.
- Attach the tip to a headband or hat.
- Add the Crayola logo to each shirt using felt or paint.
This costume celebrates group creativity without stress. Everyone participates, and nobody feels left out.
The best part? You probably have most supplies at home already. Kids love picking their color, and the photos turn out amazing every time.
Mummy Wrapped in Toilet Paper
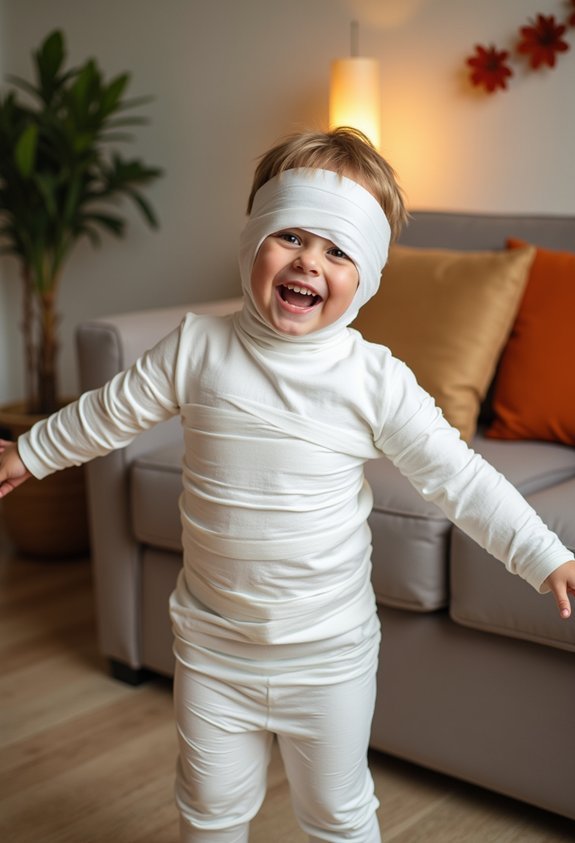
Sometimes the simplest costumes bring the biggest laughs. This classic mummy look needs just one supply you already have at home—toilet paper. Kids love the silly factor, and you’ll love how easy it is.
What you’ll need:
- 3–4 rolls of toilet paper
- White clothing underneath (optional)
Quick steps:
- Have your child stand with arms slightly out.
- Start wrapping at the ankles and work your way up.
- Use creative wrapping around the torso, leaving gaps for movement.
- Wrap loosely around arms and head, keeping eyes and nose clear.
Let some strips hang loose for that tattered mummy effect. Just remember—bathroom breaks require unwrapping!
DIY Scarecrow Using Old Clothes
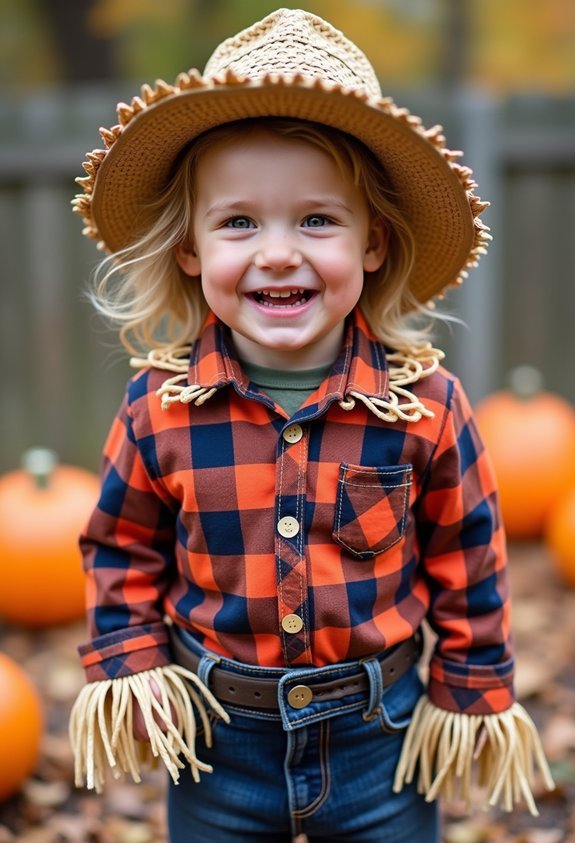
A scarecrow costume turns everyday items into something magical. Old clothes recycling gives worn-out pieces new life for one fun night.
What You’ll Need:
- Flannel shirt and patched jeans
- Straw or raffia
- Floppy hat
- Rope or twine
Simple Steps:
- Layer the flannel over a long-sleeve shirt
- Tuck straw into sleeves, pant legs, and collar
- Add patches using felt scraps
- Tie rope around the waist and wrists
Finishing Touches:
Your scarecrow accessories complete the look. Draw simple stitches on cheeks with face paint. Add a painted nose and rosy circles. A bandana or floppy hat tops it off perfectly.
Kids love stuffing straw everywhere. It’s messy. It’s silly. That’s the whole point.
Starry Night Sky Costume
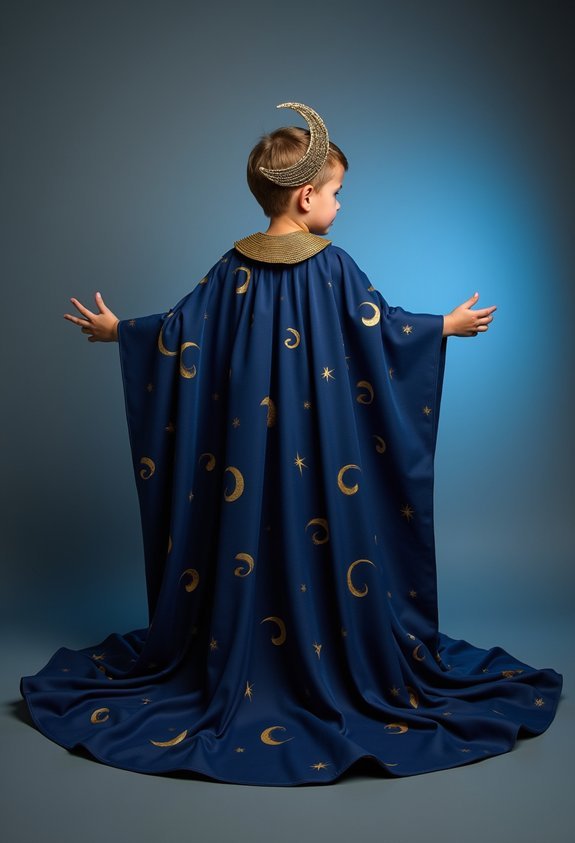
When you want a costume that sparkles with wonder, the night sky offers endless inspiration. This costume transforms your child into a walking constellation.
What you’ll need:
- Dark blue or black clothing
- Glow in the dark paint or stickers
- Star embellishments (foam stars, sequins, or fabric stars)
- Fabric glue
Simple steps:
- Start with a plain dark outfit as your canvas.
- Attach star embellishments in cluster patterns across the fabric.
- Add dots of glow in the dark paint between stars.
- Let everything dry completely before wearing.
The best part? Your child will literally light up the night. Consider adding a moon headband for extra magic. This costume works beautifully for trick-or-treating after sunset.
Cereal Killer Punny Costume
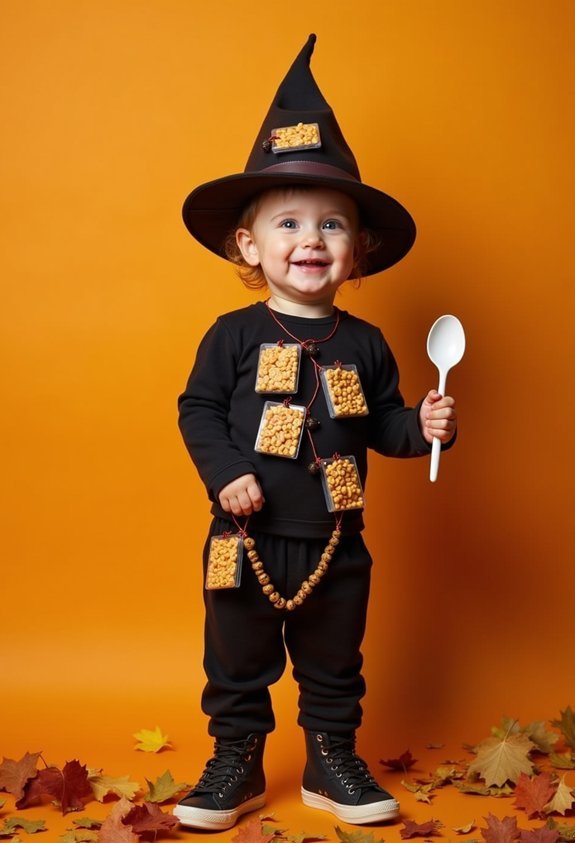
For kids who love a good pun, this costume delivers laughs all night long. Halloween puns make trick-or-treating extra fun, and this clever costume is simple to pull together.
What you’ll need:
- Mini cereal box varieties (empty ones work great)
- Plastic knife or spoon
- String or safety pins
- Dark clothing
How to make it:
- Collect several small cereal box options from your pantry.
- Poke small holes in each box and thread string through.
- Attach boxes to a dark shirt or jacket.
- Add a plastic utensil as the “weapon.”
Your child becomes a cereal killer—totally innocent and totally hilarious. Watch neighbors smile as they get the joke!
In case you were wondering
What Age Range Are These DIY Halloween Costumes Most Appropriate For?
You’ll find these DIY costumes work best for toddler costumes through school age costumes, typically ages 2-12. You can easily adjust sizing and complexity based on your child’s age and abilities.
How Far in Advance Should We Start Making These Costumes?
Like planting seeds before harvest, you’ll want to start your costume planning two to three weeks ahead. This crafting timeline gives you breathing room to gather materials, troubleshoot problems, and avoid last-minute stress.
What Basic Craft Supplies Should I Have on Hand Before Starting?
You’ll want craft supply essentials like scissors, hot glue, felt, cardboard, paint, and elastic bands ready. For costume assembly tips, keep extra fabric scraps and markers nearby—they’re lifesavers when you’re creating with kids.
How Can I Make These Costumes More Comfortable for Sensory-Sensitive Children?
Choose sensory friendly materials like soft cotton or bamboo fabrics. You’ll want to remove itchy tags, use flat seams, and avoid tight elastics. Your fabric choices should prioritize breathability and skip scratchy embellishments entirely.
Are These Costumes Safe for Trick-Or-Treating in the Dark?
You’ll boost safety by adding reflective materials to costumes and incorporating glow accessories like bracelets or necklaces. Studies confirm drivers spot illuminated pedestrians from greater distances, so you’re protecting your child effectively.
Conclusion
You’ve got the ideas. You’ve got the creativity. Now it’s time to make memories.
These costumes aren’t just outfits—they’re symbols of imagination, teamwork, and the joy you build together. Every snip of cardboard and wrap of fabric tells a story.
So grab those supplies. Let your kids lead the way. Watch their eyes light up when they see what you’ve created as a team.