17 Easy Backyard Art Projects for Kids
You can turn your backyard into an art studio without buying a single glitter bomb. Think nature paintbrushes made from sticks and flowers, leaf printing, chalk mosaics on the driveway, spray bottle fence murals, and DIY stepping stones packed with marbles and tiny toys. Add ice cube painting, sun catchers from old plastic, wind chimes from sticks, and glow-in-the-dark art so the fun doesn’t stop at sunset—and that’s only the beginning of the chaos.
Key Takeaways
- Use nature materials (sticks, leaves, flowers, rocks) to make paintbrushes, prints, and collages that are eco-friendly and quick to set up.
- Transform sidewalks, driveways, and fences with chalk mosaics and spray-bottle murals that easily wash away with rain.
- Create lasting garden art like DIY stepping stones and recycled-material sun catchers that decorate outdoor spaces.
- Encourage imaginative play with rock-painting picnics, mud kitchens, bubble wrap stomp painting, and watercolor spray sheets.
- Add variety with creative weaving, cardboard castles, shadow art, paint ice cubes, natural tie-dye, and glow-in-the-dark wind chimes.
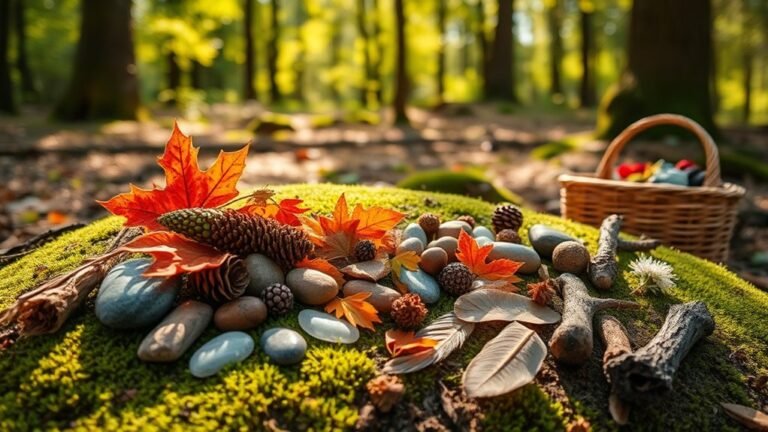
Nature Paintbrushes and Leaf Printing

Once you step outside, your backyard basically turns into a free art store—no coupons, no glitter stuck in your carpet forever.
You just grab sticks, rubber bands, and leaves to build wild “nature paintbrushes.” Wrap soft grass, pine needles, or flowers to the tip of a stick, tie it tight, then dip the fuzzy end in paint. Drag it across paper and boom—instant nature inspired art with crazy textures you’ll never get from a store brush.
For leaf printing, brush paint on the bumpy side of a leaf, flip it, and press it down hard. Peel it up like a sticker. Now you’ve got crisp leaf veins, cool shapes, and zero plastic trash, because you used eco friendly materials from your own yard today.
Sidewalk Chalk Mosaics
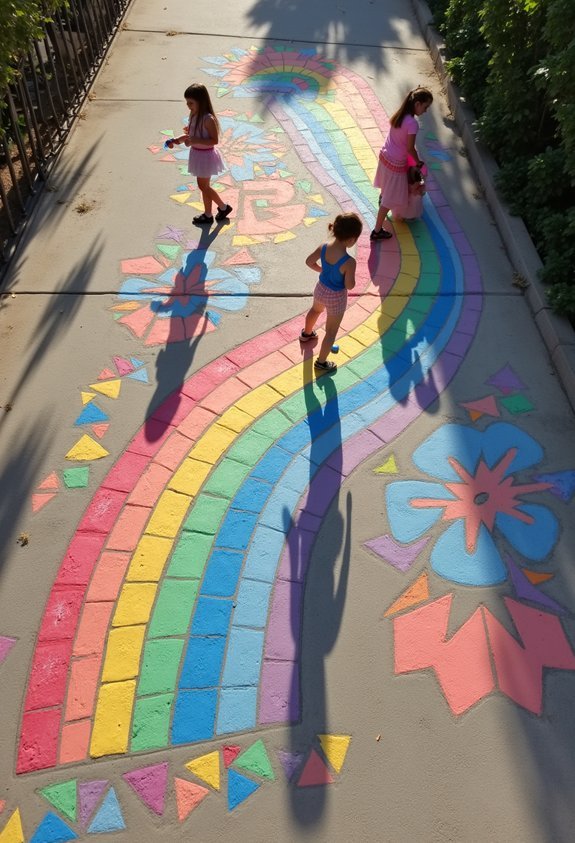
How do you turn a boring driveway into a fake stained-glass window your neighbors will low-key stare at? Easy: sidewalk chalk mosaics.
First, grab painter’s tape and go wild. Crisscross lines all over the concrete so you get tons of little shapes—triangles, diamonds, random weird polygons that look like a broken screen. Press the tape down hard.
Now comes the fun part: color. Test chalk color combinations in one corner. Try sunset vibes with pink, orange, and yellow, or icy blues and purples for “I’m a wizard” energy.
For mosaic pattern inspiration, peek at tiled floors, Minecraft builds, or old church windows online. Then color each section different.
Peel the tape and boom—instant masterpiece. Kids feel proud, and cleanup is just one rainstorm away.
DIY Garden Stepping Stones

Your driveway art game is strong, so let’s move that creative chaos into the garden. Grab some shallow plastic pans, quick‑setting concrete, water, and a stick for mixing. Pour in the concrete, smooth the top, and boom—you’ve got a blank mini stage.
Now comes the fun part: wild stepping stone designs. Let kids press in marbles, bottle caps, shells, LEGO bricks, or toy cars. Spell names with alphabet beads. Make goofy faces or secret arrows that point to the snack stash.
Let kids go wild—press in toys, shells, marbles, and secret snack‑trail symbols
For colorful mosaics, break old tiles or use flat glass gems and push them in like a puzzle.
Let the stones dry, pop them out, and line a path. Suddenly the garden looks like a tiny outdoor art gallery made by your crew.
Spray Bottle Fence Murals
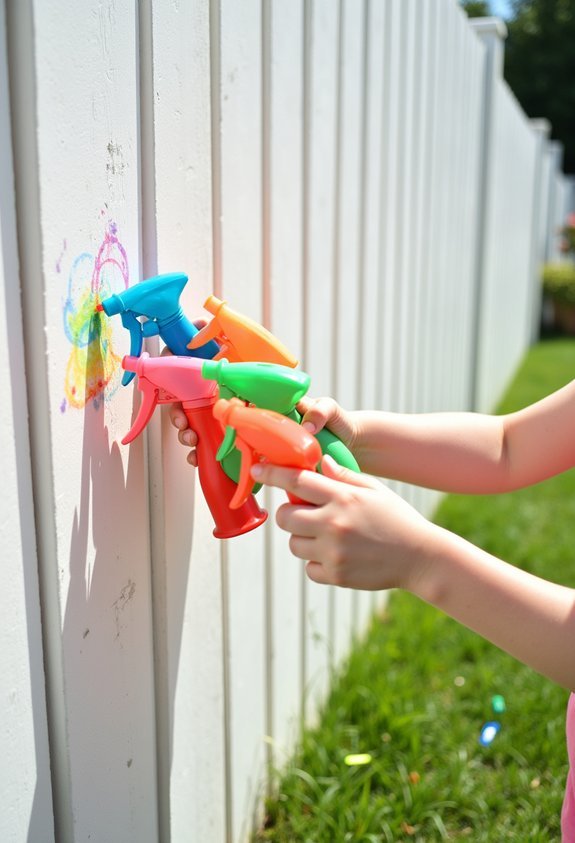
Even if the rest of the yard is pure chaos, a fence is a giant blank canvas just begging for some color. Grab a few cheap spray bottles, fill them with watered‑down washable paint, and boom—you’ve got kid‑friendly graffiti tools.
Show your kids basic spray bottle techniques: long misty sprays for clouds, quick blasts for stars, slow drips for “slime.” They’ll figure out the rest fast.
For easy mural design ideas, draw light chalk outlines first: giant rainbows, jungle vines, underwater scenes, or a city skyline with monster attacks.
Let each kid “own” a section of fence. Set a rule: no spraying faces, only the wood. When they’re done, take photos—the next rainstorm is your eraser. Kids love watching colors drip, melt, and mix.
Sun Catchers Made From Recycled Materials
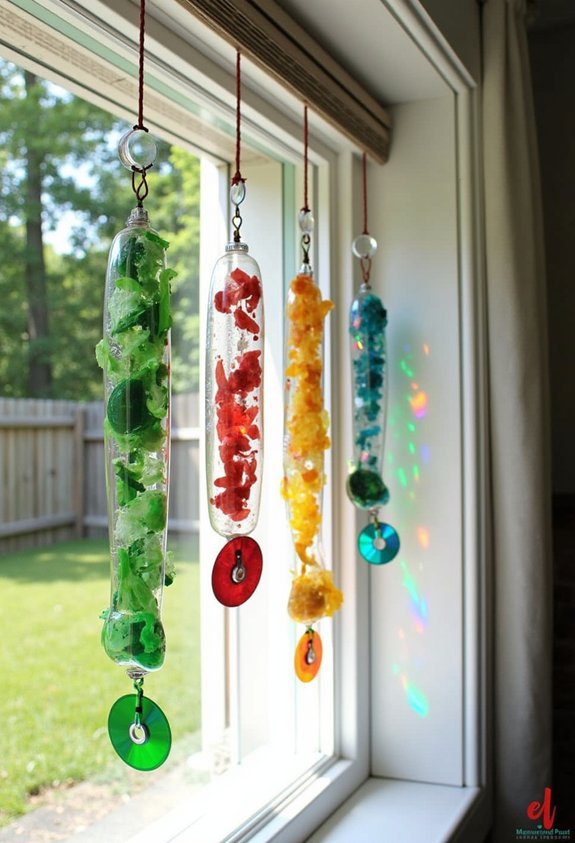
Fence all splattered and glorious? Keep the color party going with sun catchers made from recycled materials. You don’t need fancy craft stuff; you need your recycling bin.
Grab clear plastic lids, wide-mouth jars, old CD cases, even plastic berry boxes. Wash them fast, then raid the scrap stash: tissue paper bits, foil, candy wrappers, broken crayons.
Set kids up at a sunny table. Brush on a thin layer of glue, then let them stick on bright scraps like tiny stained glass. Add string or yarn before it dries so you can hang them.
Clip finished sun catchers to a clothesline, fence, or tree branch. When the light hits them, boom—instant rainbow explosion in your backyard. Kids feel proud, and you secretly recycled trash.
Rock Painting Picnic
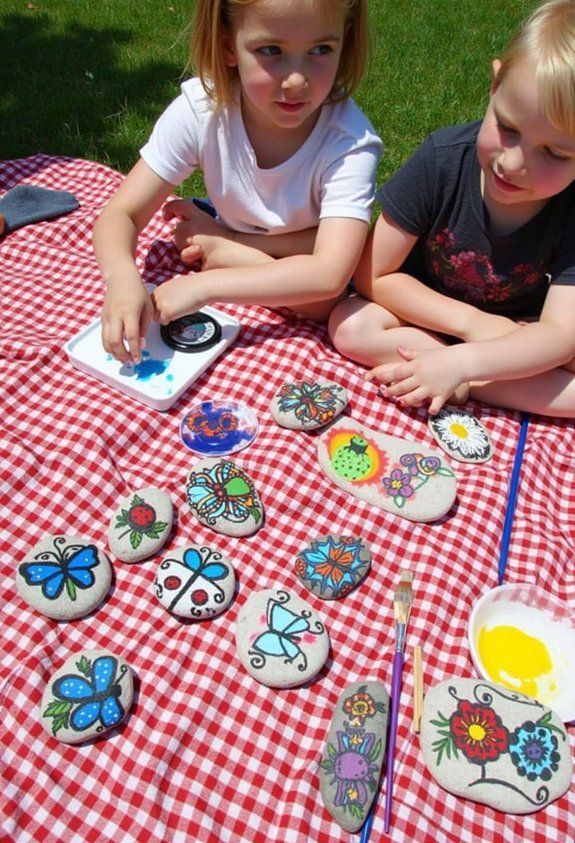
One blanket, a pile of snacks, and a bucket of rocks—that’s all you need for a rock painting picnic that feels way fancier than it is.
Spread the blanket, dump out the rocks, and let the chaos begin. Hand kids paint, brushes, and maybe old shirts you don’t love. Start with simple faces, stripes, and dots.
Then push into rock color mixing: “What happens if blue crashes into yellow?” Instant science, zero boredom.
While the paint dries, snack and tell wild stories about your “pet” rocks. Finally, build picnic rock displays along the blanket’s edge, like a tiny outdoor museum.
Take photos, then hide a few rocks around the yard so kids can “discover” them later and brag about their finds to everyone else.
Mud Kitchen Masterpieces
Because nothing says “childhood” like filthy hands and fake soup, a mud kitchen might be the best backyard art studio you’ll ever set up. You don’t need fancy gear; old pots, plastic bowls, and a busted muffin tin work great. Pile in dirt, water, leaves, rocks, and boom—instant mud pie creativity. Your kid is suddenly head chef of a five-star swamp café.
Treat it like outdoor cooking without the fire or the stress. Ask for “spicy leaf soup” or “triple chocolate gravel cake.” Talk about textures, colors, and smells while they stir, pour, and mash.
When they splatter everything, celebrate it. That mess is problem-solving, pretend play, and wild imagination, all squished between muddy little fingers. You just grew an artist in the dirt.
Bubble Wrap Stomp Painting
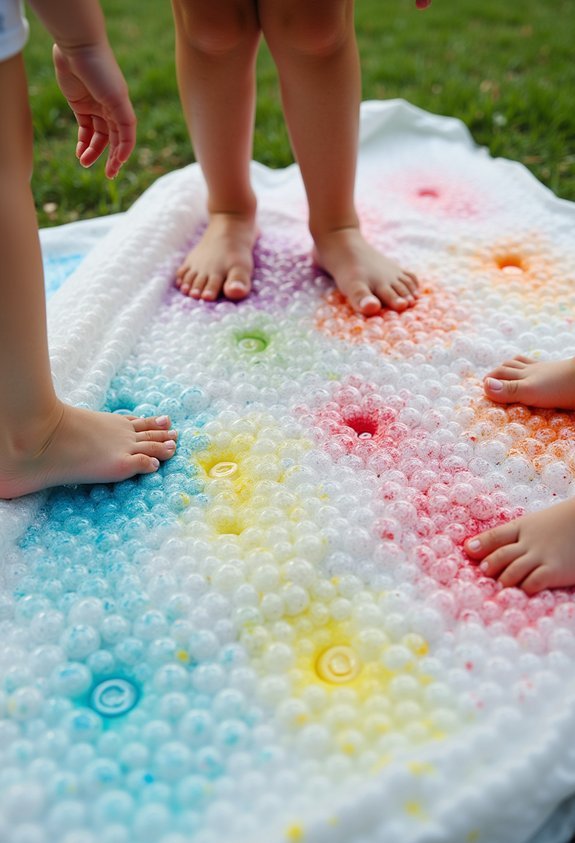
There’s no better way to paint than by tap-dancing on bubbles like a tiny, joyful monster.
Spread a big sheet of paper on the grass, tape it down, and lay strips of bubble wrap on top. Squirt bright paint colors right onto the bubbles—think wild blues, neon pinks, slime green.
Now have the kids step on with bare feet or old socks and start stomping. Every pop leaves a weird, spotty print, like comic-book footprints. Tell them to jump, twist, march in lines, even crab-walk across.
When the bubble wrap looks smashed and the paper’s covered, peel it off for the big reveal. Boom—instant crazy artwork, super messy, totally worth the cleanup.
Let it dry, then hang it outside like backyard graffiti everywhere.
Flower Petal Collage Art
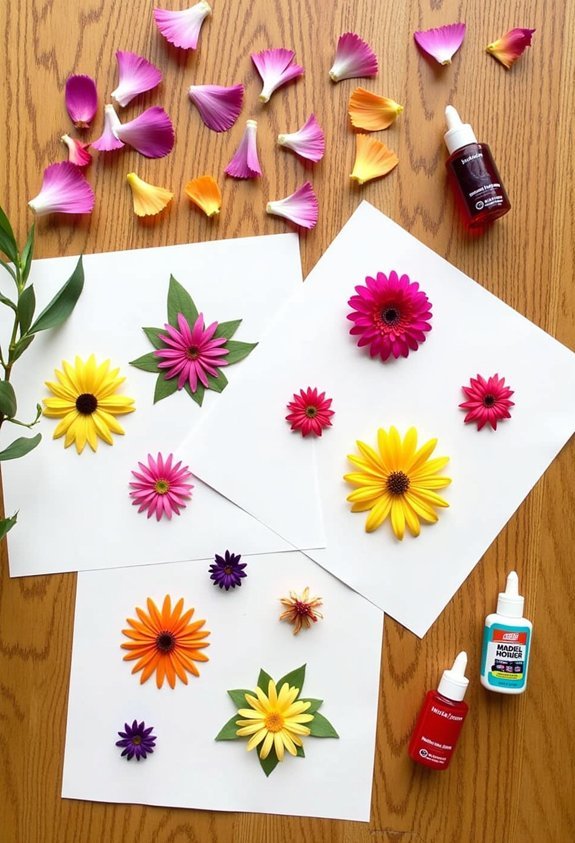
Instead of tossing those wilted flowers in the trash, turn them into fancy backyard art like you’re running a tiny fairy craft studio. Grab a tray, some paper, and a glue stick, then raid the yard for petals, leaves, and tiny sticks.
Lay everything out first, like a salad bar of color. Now play with flower petal arrangements: spirals, hearts, crazy monsters, even pretend pizzas. You can talk about nature color mixing as you go—dark purple next to yellow pops like fireworks, while soft pinks feel calm and sleepy.
Glue pieces down once you like the design. Let kids name each collage: “Petal Dragon,” “Leaf Pizza,” whatever. Dry them flat, then hang their wild garden gallery inside. Instant art show, zero fancy supplies needed.
Watercolor Spray Sheet Art

On days when the kids are bouncing off the walls, watercolor spray sheet art is your “let’s go outside before we all lose it” project.
Watercolor spray sheet art: the emergency “take it outside before we all lose it” project
Grab an old white sheet, some washable liquid watercolors, and a couple of cheap spray bottles. Hang the sheet on a fence, step back, and let the chaos begin.
Show the kids simple watercolor techniques first: big Xs, dots, stripes. Then say, “Okay, now go wild.”
They’ll pump those bottles like tiny firefighters, and colors will drip, blend, and explode across the fabric. It’s spray art, not museum art, so there’s zero pressure.
When the sheet dries, you’ve got a giant, wobbly rainbow to use as a fort wall, puppet backdrop, or backyard stage curtain. They’ll remember it tomorrow.
Stick and String Weaving Frames

Before your kids start sword-fighting with sticks, turn those things into weaving frames and call it “art class.”
Grab a few sturdy sticks from the yard, some yarn or string, and boom—you’ve got a simple loom kids can actually hold in their hands.
Lay two sticks in a V or square, tie the corners tight, then wrap string back and forth to make the base.
Now the fun chaos starts. Kids can hunt for leaves, flowers, or grass and start building wild weaving patterns right on the frame.
To paint the scene:
- Bright yarn zigzags through crunchy brown leaves.
- Tiny flowers peek out like secret treasure.
- Colorful frame decoration with tape, markers, or stickers finishes the masterpiece.
Kids cheer like crazy.
Cardboard Box Castle Decorating
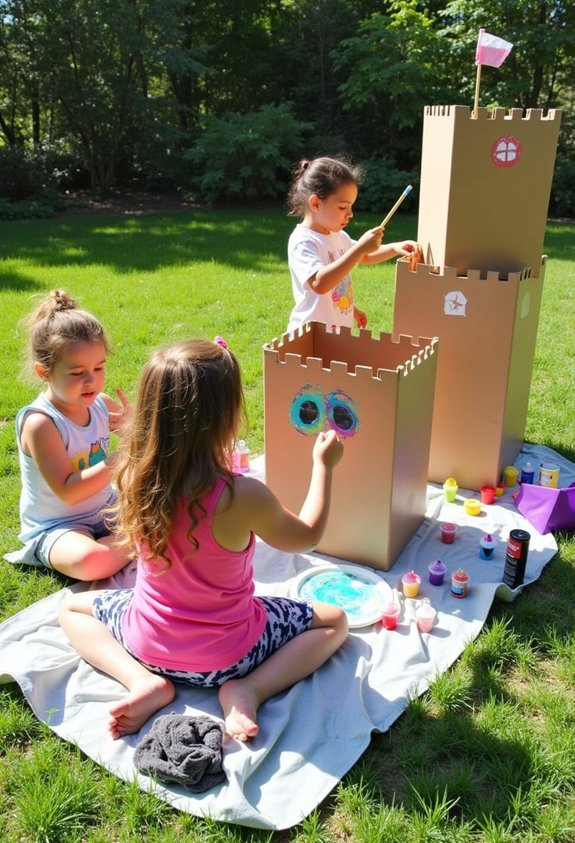
Those stick looms were fun, but now it’s time for the final boss of backyard art: the cardboard box castle.
Drag every box you can find outside—moving boxes, shoe boxes, that giant one from the new TV. Stack them, tape them, and boom: cardboard fortresses rise from the lawn like budget Hogwarts.
Turn your recycling pile into a cardboard kingdom, no instruction manual or royal budget required
Cut doors, draw stone blocks, add flags from scrap fabric or paper towels. Now hit it with creative painting. Use sponges for “stone,” stripey straws for “brick,” and fingerprints for magical sparkles.
Hand kids markers to design shields, windows, even a dragon graffiti tag. When the castle’s done, let them rule it, defend it, or just chill inside with snacks like tiny, sticky royalty.
Take pictures before rain attacks your masterpiece today.
Shadow Tracing Silhouette Art
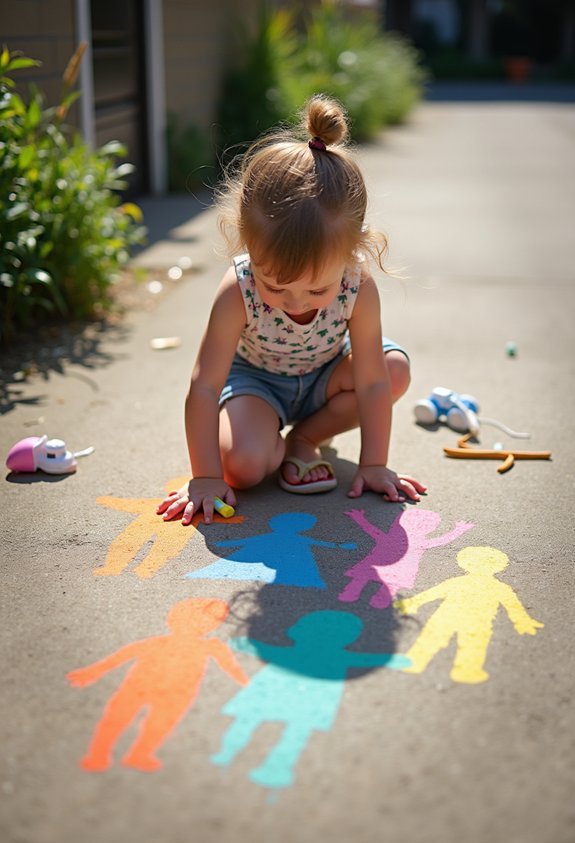
Some days the sun is basically a free art tool just begging you to use it. Grab chalk or paper and a pencil, head outside, and turn shadows into wild backyard masterpieces. It’s simple, but it feels like magic.
- Line up toys, plants, or even a patient sibling so their shadows fall on paper. Trace the outline fast before the sun sneaks away.
- Want drama? Try shadow puppet storytelling. Pose your hands like a wolf, dragon, or duck, then trace the crazy shapes.
- Go for silhouette animal portraits. Stand plastic animals on a table, tape paper behind them, and sketch their shadow edges.
Color everything in, add patterns, and boom—instant museum of weird, wonderful silhouettes. Snap photos to remember them before the wind attacks.
Ice Cube Painting on the Patio
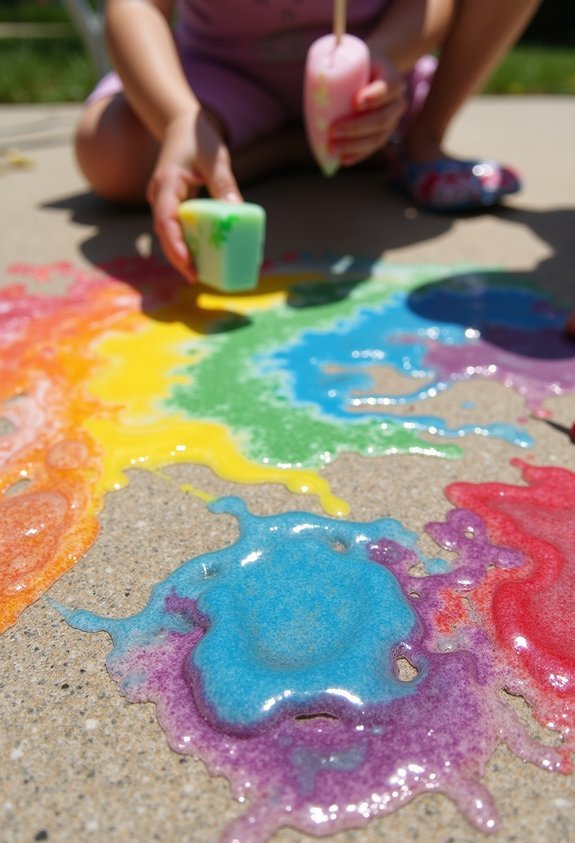
Shadow art is fun, but let’s be honest—sometimes you just want to make a giant colorful mess.
For this one, you turn your patio into a mini art lab with frozen paint. Grab an ice cube tray, squirt in washable paint, top with water, and add popsicle sticks. Freeze it. Boom: ice cube colors.
Spread big sheets of paper or an old shower curtain on the patio. Hand the kids the paint cubes and let them slide, scribble, and drip as the cubes melt. It’s like drawing with tiny, slippery comets.
Talk about which colors blend, notice the patterns, and cheer on the wild splashes. It’s creative cooling, art class, and heat escape plan, all in one ridiculous, happy mess. Your patio secretly approves.
Natural Dye Tie-Dye T-Shirts
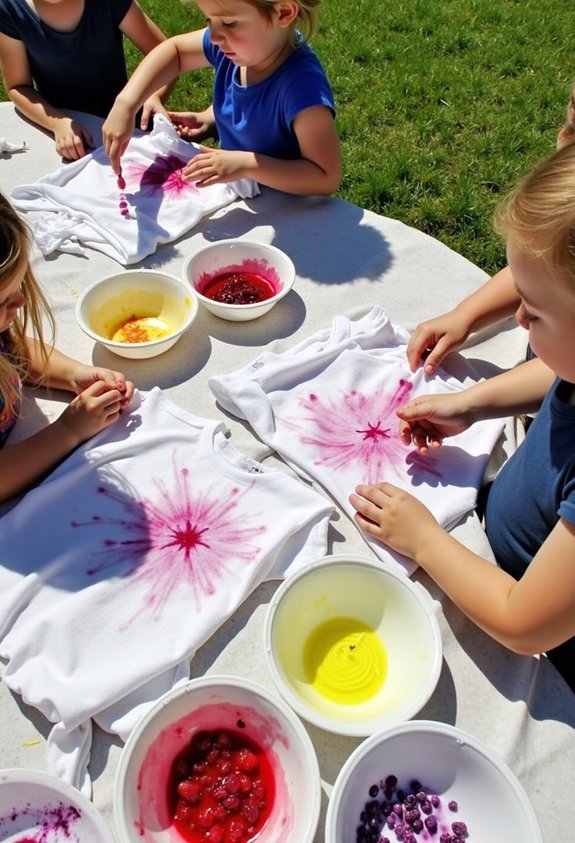
Nobody tells you that your kitchen can turn into a secret T-shirt lab with just some old veggies and a big pot.
You toss in onion skins, spinach, maybe those sad blueberries from the back of the fridge, and boom—natural dye techniques in action.
Let everything simmer, then dunk plain cotton shirts into the color bath like magical noodles.
Now twist and fold to make wild t shirt patterns:
- Spiral the shirt from the center and rubber-band it tight for a giant galaxy swirl.
- Fold it like an accordion, band a few stripes, and get bold lightning lines.
- Crumple the shirt, slap on lots of bands, and reveal a crazy storm of color when it dries.
Hang them outside and cheer like wild artists.
Wind Chimes From Backyard Finds

Even if your yard looks “meh” at first glance, it’s secretly full of stuff you can turn into a wind chime that sounds cool instead of like a broken shopping cart.
Start by hunting for wind chime materials: sturdy sticks, shells, acorns, old keys, bottle caps, even a lonely Lego that stabbed your foot last week.
Scavenge your yard for wind chime loot: sticks, shells, acorns, keys, bottle caps, rogue Legos
Tie pieces to a stick or metal ring with yarn or fishing line, spacing them so they can bump. This is where sound exploration kicks in.
Tap each piece. High ping? Low clunk? Too loud, like your cousin’s drum set? Swap items till the mix feels right.
Hang your creation where the breeze hits and wait for your backyard concert to start.
It’ll be weirdly relaxing and awesome.
Glow-in-the-Dark Patio Art
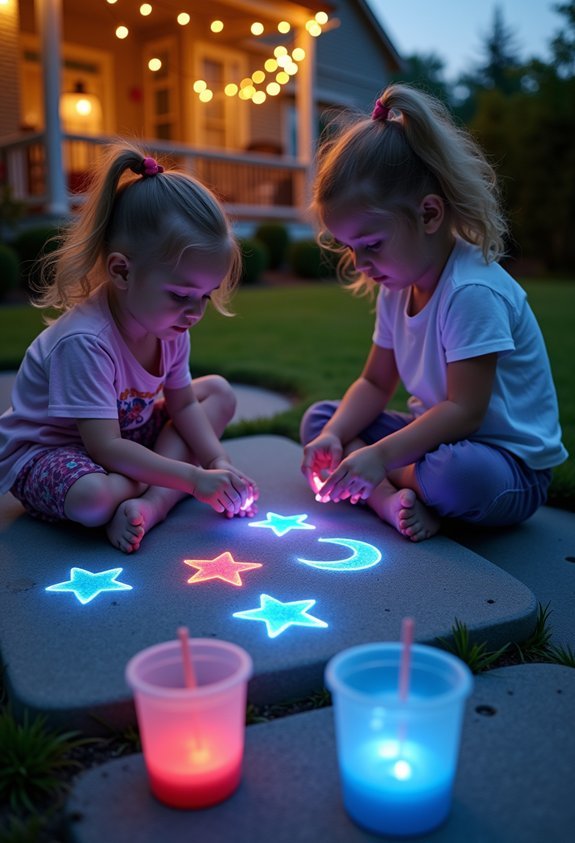
When the sun finally clocks out, your patio doesn’t have to turn into a boring dark blob. Grab some glow paint, your kids, and anything that’ll sit still long enough to be art. Old flower pots, rocks, cardboard boxes—perfect victims.
Here’s what you can do:
- Paint crazy monster faces on rocks, then line them along the path. At night they look like a glowing rock gang guarding your lawn.
- Brush glow paint on flower pots in dots and stripes. When the lights go out, boom—instant magic garden.
- Make a glow-in-the-dark hopscotch grid on cardboard or flat stones. Suddenly, “bedtime” becomes code for backyard nighttime fun, and your kids sprint outside like someone yelled, “Free candy!” You might even actually join them.
In case you were wondering
How Can I Adapt These Projects for Children With Sensory Sensitivities or Autism?
You can adapt projects by using sensory friendly materials, offering predictable steps, limiting noise, and emphasizing visual stimulation activities; you involve choice, model each action, provide breaks, and respect your child’s cues to prevent overwhelm.
What’s the Best Way to Store Finished Backyard Art so It Doesn’T Get Ruined?
Protect precious projects by drying them fully, sealing surfaces, and storing them flat. You use clear bins, cardboard dividers, silica packets, art preservation techniques and proper storage solutions that don’t let moisture or sunlight inside.
How Do I Prevent Kids’ Art Supplies From Attracting Bugs or Animals Outdoors?
You prevent pests by sealing paint, glue, and snacks separately, using lidded bins for art supply storage, adding silica or baking soda packets, and bringing everything indoors after use for outdoor protection and less odor.
Which of These Projects Are Safe for Very Young Toddlers Under Supervision?
You can safely do finger painting with edible or washable paints, large-handled brushes, and big paper sheets. You can also create simple nature collages using large leaves, flowers, and tape, avoiding small pieces that toddlers.
How Can I Turn These Backyard Art Activities Into a Themed Birthday Party?
You turn the activities into an art-party by setting up stations, using themed decorations, and coordinating colors. Let kids rotate, display finished pieces, serve snacks, and send them home with art kits as party favors.
Conclusion
So now your backyard’s basically an art studio with grass. You’ve got spray murals on the fence, mystery footprints in the stepping stones, and shirts so colorful the neighbors need sunglasses. Picture this: it’s Saturday, your kid’s “just five more minutes” of ice painting turns into two hours, three masterpieces, and exactly one blue dog (don’t ask). That’s the magic. Go grab some chalk, leaves, and old jars—and let your yard get gloriously messy.